5 Steps To Host Static Website On DigitalOcean Running Ubuntu 19.10
Table of Contents

Introduction
Some tasks seem so simple when you are performing them regularly. If however you stay for a period of time without performing these tasks, it takes a lot of effort trying to recall the commands and the flow of how you performed those tasks. Setting up websites is one of those tasks; set it up and maybe it will take a long time before you repeat the process; by that time you have already forgetten how you went about it.
In this post, we document the steps of setting a static website on a DigitalOcean droplet running on Ubuntu 19.10. We also enable HTTPS for the site using certificates issued by Let’s Encrypt. By documenting these steps we will have a point of reference in case we forget how we went about it.
Prerequisites
- A DigitalOcean droplet/server running Ubuntu 18.04 or higher
- You have registered a domain name with your preferred domain name registrar.
- Your domain name DNS records at your domain name registrar have been updated to point to DigitalOcean. It takes a while (between 4-48 hours) for a DNS change to fully take effect. The updating process is called DNS propagation. Subdomains take a shorter propagation time.
- Created a user with
sudoprivileges on your server and the user can log in to the server/droplet. - You have installed and configured your Nginx web server.
In this article we will be using the name kagundajm for the domain and user name. Be sure to replace kagundajm with your preferred name if you decide to follow along.
1. Create Domain/Sub-Domain
Log in to your droplet and click on Networking on the left sidebar. Type your domain name (Ex. kagundajm.com). If you have more than one DigitalOcean project configured, select project that the domain will belong to and click on Add Domain button.
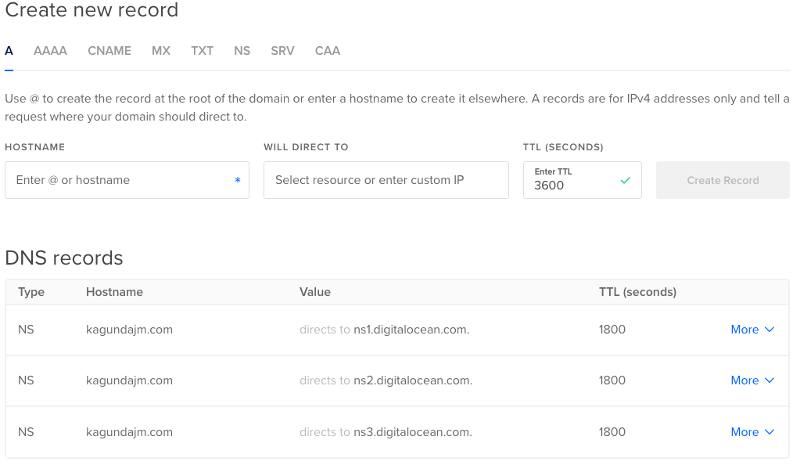
After successful creation of the domain, you should be redirected to the Create new recored page. We will use this page to create A/AAA records for the domain. An A record allows you to point your domain or subdomain to an IPv4 address while an AAA points your domain or subdomain to an IPv6 address.
Under HOSTNAME, type @ and under WILL REDIRECT TO select your droplet and when done, click on Create Record. We also need to add another record for the www subdomain. Under HOSTNAME type wwww and select your droplet/server as the IP that the record will redirect to. When done, click on Create Record to complete the task. If you have another subdomain you want to create, repeat the step of creating the www but replace www with your subdomain name.

2. Create Website Folder
SSH to your server/droplet using a user who has root access with a command similar to the following ssh kagundajm@server_ip_address and create a folder to host the website files: sudo mkdir /var/www/kagundajm.com
Make website folder be owned by the non-root user and www-data group by running sudo chown -R kagundajm:www-data /var/www/kagundajm.com and sudo chmod g+s /var/www/kagundajm.com commands. Setting the non-root user as the owner will allow the user to upload files to the folder without landing into permission errors. g+s means that all new files and sub-directories created within /var/www/kagundajm.com folder will inherit the group ID of the website folder.
3. Create Virtual Host (Server Blocks) File
Virtual host (server blocks) files are configuration files that inform the web server to route traffic bases on the domain name and other parameters. These virtual host (server blocks) enable hosting of multiple websites on a single server. Each website on the server should have at least one virtual host file that will reflect, the the directory (root) that will hold the website files and the domain names.
We will create our virtual host file by creating a copy of default file by running sudo cp /etc/nginx/sites-available/default /etc/nginx/sites-available/kagundajm.com. Open the file we have created using the Nano editor sudo nano /etc/nginx/sites-available/kagundajm.com and update to reflect data for our website. When you have completed making the changes, press Ctrl+O to save, press ENTER key to confirm the file name and finally Ctrl+X to exit the editor. After the changes, the file should resemble the following:
To complete this step, we need to enable our site. To do this, we create a symlink (symbolic link or shortcut) to the file we have created to sites-enabled folder ln -s /etc/nginx/sites-available/kagundajm.com /etc/nginx/sites-enabled. In future, if we want to disable the site without deleting the files, we only need to run sudo rm -rf /etc/nginx/kagundajm.com.
Next we need to test that we have not made any mistakes while creating the configuration file. Run sudo nginx -t and if you should get a response like the following:
Finally, we restart nginx in order for the changes to take effect by running sudo service nginx restart.
4. Install SSL Certificates
This step will only be possible if the DNS records for the domain have propertly propagation. To confirm that propagation has taken effect, try pinging both ping kagundajm.com -c4 and ping www.kagundajm.com -c4. If you get a message similar to ping: www.kagundajm.com: Name or service not known then the propagation has not completed and you have to continue waiting.
When the ping is successful, confirm Certbot is installed certbot --version. A successful installation should display the version number of Certbot. If however the command responds with command not found: certbot then you require to install Cerbot running the following commands:
Now that we can ping our domains and we have confirmed that Certbot is installed, we can install SSL certificates by running sudo certbot --nginx -d kagundajm.com -d www.kagundajm.com
5. Upload Website Files
Uploading of the website files will be performed from your local computer. You can use any method that you are comfortable with in uploading the files to the server.
In this post we will use rsync (Remote Synchronization) command line tool. The tool is not available by default in Windows. However, if you are using Windows 10, you can enable Windows Subsystem for Linux (WSL) from the Control Panel > Turn Windows features on or off. Doing this will enable you to get access to the rsync command. If you don’t wish to install WSL, you can install Cygwin and after installation, you should be able to access the rsync command line tool.
Open a terminal window, change directory to the location where the website files are located and run the following command.
rsync -azv -e "ssh -i ~/.ssh/kagundajm-com-rsa" ./ kagundajm@kagundajm.com:/var/www/kagundajm.com --delete
a- shorthand for--archive. Preserves permissions (owners, groups), times and symbolic links.z- shorhand for--compress. Compresses the files data during the transferv- shorthand for--verbose. Displays visual output showing progress for the transfer process--delete- removes obsolete files on the destination folder.
If you you run into an error similar to:
rsync: connection unexpectedly closed (8 bytes received so far) [sender]
rsync error: error in rsync protocol data stream (code 12)
while running the rsync command, verify that the destination folder exists or whether you have write permissions to the destination folder.