How To Install ODK Central on Ubuntu 20.04
Table of Contents
Introduction
The Open Data Kit (ODK) is an open-source set of tools and standards designed to help organizations and individuals in the field of data collection. ODK consists of several components, including ODK Central and ODK Collect. ODK Central is the ODK server that manages user accounts and permissions, stores form definitions, and lets data collection clients like ODK Collect connect to it for form download and submission.
In this blog article, you will learn how to install ODK Central on a custom Ubuntu server. You’ll learn:
-
How to check for your domain name DNS propagation
-
Checking your server for available disk space
-
Installing and configuring the Docker Engine
-
Use Docker without prefixing commands with
sudo. -
How to change the location where Docker stores data.
-
Downloading and initializing the ODK Central components
By following this article, you’ll have your own ODK Central server up and running ready for data collection.
Prerequisites
Before starting the installation process, make sure you have:
-
A server running Ubuntu 20.04 or higher
-
A registered domain name for your ODK Central server. This guide uses odk-central.example.com for the domain name.
-
Created the domain (odk-central.example.com) and sub-domain (www.odk-central.example.com) names on your hosting provider.
-
Familiarity working on the Linux command line interface.
-
Access to the Linux command line interface (CLI) of the server.
Checking DNS Propagation
Domain Name System (DNS) propagation is how long it takes for changes to a domain name to spread to all the DNS servers on the internet. The time taken varies from a few hours to as long as 48 hours.
Online tools exist that may assist in checking the DNS propagation of your domains and sub-domains. DNS Propagation and DNS Google among others are some of the tools that can help in checking on the propagation process.
From your local computer, you can test whether your domain name is reachable using the ping command.
Open a terminal or command window and run the following command.
ping odk-central.example.com -c4
The option -c4 specifies the number of requests. You don’t need to type -c4 when you run the command on a Windows computer. Windows defaults to four ping requests. Replace odk-central.example.com with your domain name.
If the response you get is similar to “ping: cannot resolve odk-central.example.com: Unknown host” or “Ping request could not find host odk-central.example.com. Please check the name and try again.”, then your server is not reachable.
Do not forget to also run the ping command on the www sub-domain.
ping www.odk-central.example.com -c4
Checking for Available Disk Space
ODK Central uses multiple Docker containers. During the installation process, Docker images required by ODK Central service get downloaded to the server. Before starting the install process, verify that your server has adequate space. Establish whether the available space is on one hard disk drive or spread over multiple hard disk drives.
To display the drives and space used, run df --human-readable or df -h command from a terminal window.
The following is an example output for the df -h command on a server provisioned on DigitalOcean.
Filesystem      Size  Used Avail Use% Mounted on
udev            3.9G     0  3.9G   0% /dev
tmpfs           797M  1.6M  795M   1% /run
/dev/vda1       155G   11G  145G   7% /
tmpfs           3.9G     0  3.9G   0% /dev/shm
tmpfs           5.0M     0  5.0M   0% /run/lock
...
Observe that the example output shows that the server has one partition /dev/vda1 mounted on the root (/) directory with 145Gb of free space.
However, running the df -h command on a custom server may display different results like the one shown in the example output below:
Filesystem                   Size  Used Avail Use% Mounted on
/dev/root                     29G  2.1G   27G   7% /
devtmpfs                     3.9G     0  3.9G   0% /dev
tmpfs                        3.9G     0  3.9G   0% /dev/shm
tmpfs                        796M  1.1M  795M   1% /run
/dev/sdb1                    503G   73M  478G   1% /data
...
From the output, observe that the custom server has two disk partitions; /dev/root mounted on root (/) directory with 27Gb of free space and /dev/sdb1 mounted on /data directory with 476Gb of free space.
To avoid running out of disk space on the root directory, you need to configure the Docker Engine to store data on the /data directory. You should also install ODK Central on the /data directory.
Install Docker Engine
A Docker Engine installation on Ubuntu requires a 64-bit version of Ubuntu 18.04 or higher. You can check the installed version of Ubuntu on your server by running lsb_release -a or cat /etc/lsb-release command from a terminal window.
-
Update the server’s local repository package information.
sudo apt updateRunning this command is required every time before you install or upgrade software.
-
Install packages required to install Docker.
sudo apt install ca-certificates curl gnupg lsb-releaseca-certificates: common digital certificates used to verify and encrypt data between a server and other websitescurl: tool used to transfer data from one server to another server.gnupg: command line tool that encrypts and signs files. It is also known asgpg.lsb-release: a utility that displays Linux Standard Base (LSB) information about a Linux distribution.
-
Download Docker’s official GPG key specific to Ubuntu and save the key to /usr/share/keyrings/docker-archive-keyring.gpg file on our server.
curl -fsSL https://download.docker.com/linux/ubuntu/gpg | sudo gpg --dearmor -o /usr/share/keyrings/docker-archive-keyring.gpg -
Add Docker’s stable repository to your server’s local packages’ repository.
echo \ "deb [arch=$(dpkg --print-architecture) signed-by=/usr/share/keyrings/docker-archive-keyring.gpg] https://download.docker.com/linux/ubuntu \ $(lsb_release -cs) stable" | sudo tee /etc/apt/sources.list.d/docker.list > /dev/null-
dpkg --print-architecture: determines the system’s architecture, such asamd64 -
lsb_release -cs: outputs the Linux distribution release codename, such asbionicfor Ubuntu 18.04 orfocalfor Ubuntu 20.04 -
tee: will read input fromechocommand and write the output to /etc/apt/sources.list.d/docker.list file
-
-
Update packages in our server’s repository.
sudo apt update -
Install the latest version of Docker Engine.
sudo apt install docker-ce docker-ce-cli containerd.io -
Confirm Docker has been installed by reading the version number.
sudo docker -v -
Make sure that the docker service starts automatically on server reboot.
systemctl enable docker
Configure Docker Data Root Folder
By default, Docker stores all its data within the /var/lib/docker directory. You can verify the location by running the
docker info
command and looking for Docker Root Dir entry from the output.
Alternatively, you can run
docker info | grep "Docker Root Dir"
to display only the output for the Docker Root Dir entry.
-
Stop the Docker service.
sudo service docker stop -
Open /etc/docker/daemon.json JSON settings file using the nano editor.
sudo nano /etc/docker/daemon.json -
Update the settings file to set the Docker Root Dir to a new folder.
{
  "data-root": "/data/docker-data"
}
/data/ is the partition on the custom server that has adequate space and docker-data is the folder on the new partition. Replace /data/ and docker-data with your own values.
-
Press Control + O (^O) to save the changes.
-
Press ENTER key to confirm the file name.
-
Press Control + X (^X) to close the editor.
-
Restart the Docker daemon.
sudo service docker start -
Confirm that Docker’s storage location has been updated to match the entry in our /etc/docker/daemon.json file.
docker info | grep "Docker Root Dir"The output should reflect the changes you made in our settings file - Docker Root Dir: /data/docker-data
Use Docker As Non-Root User
Every time a non-root user runs the docker command, the user must prefix the command with sudo. To avoid typing sudo docker, add the currently logged-in user to the docker group.
-
Create the docker group.
sudo groupadd docker -
Add the logged-in user to the docker group.
sudo usermod -aG docker $USERYou can also replace $USER with the actual value for the username.
sudo usermod -aG docker kagunda -
Activate the changes to groups.
newgrp dockerYou can log out and log back in again to the server if running the command does not work.
-
Verify that you can run
dockercommand without prefixing the command withsudo.docker run hello-world
Install Docker Compose
-
Visit the Docker Compose releases page and note down the latest release version number.
-
Download the latest stable release of Docker Compose. Replace v2.23.0 in the command with the version number obtained in the previous step. Prefix the version number with a v.
sudo curl -L "https://github.com/docker/compose/releases/download/v2.23.0/docker-compose-$(uname -s)-$(uname -m)" -o /usr/local/bin/docker-compose -
Assign execute permissions to the docker-compose binary:
sudo chmod +x /usr/local/bin/docker-compose -
Optionally, create a symbolic link to /usr/bin
sudo ln -s /usr/local/bin/docker-compose /usr/bin/docker-compose -
Test the docker-compose installation.
sudo docker compose version
Install ODK Central
-
Disable UFW firewall. UFW (Uncomplicated Firewall) comes pre-installed on Ubuntu.
ufw disable -
Change directory to partition with adequate space
cd /dataIf you forget this step, ODK Central software files will be placed on the root (/) partition, which has limited space.
-
Download the ODK Central software.
sudo git clone https://github.com/getodk/centralIf you connected to the server as a root user, omit the
sudo.git clone https://github.com/getodk/centralThe following is an example output after performing the above step.
root@odk-server:/data# root@odk-server:/data# git clone https://github.com/getodk/central Cloning into 'central'... remote: Enumerating objects: 1015, done. remote: Counting objects: 100% (1014/1014), done. remote: Compressing objects: 100% (499/499), done. remote: Total 1015 (delta 550), reused 912 (delta 490), pack-reused 1 Receiving objects: 100% (1015/1015), 191.22 KiB | 5.03 MiB/s, done. Resolving deltas: 100% (550/550), done. root@odk-server:/data# root@odk-server:/data# -
Move to the ODK Central installation folder
cd central -
Download the missing ODK Central components.
git submodule update -iBelow is an example output after the command has run.
root@odk-server:/data# root@odk-server:/data# cd central/ root@odk-server:/data/central# git submodule update -i Submodule 'client' (https://github.com/getodk/central-frontend.git) registered for path 'client' Submodule 'server' (https://github.com/getodk/central-backend.git) registered for path 'server' Cloning into '/data/central/client'... Cloning into '/data/central/server'... Submodule path 'client': checked out '5cc6fd79d112ce36d6298c61bb8817689c4c323b' Submodule path 'server': checked out '1d1a3a59969e61383da74119e405e67778b7a170' root@odk-server:/data/central# root@odk-server:/data/central# root@odk-server:/data/central# -
Copy ODK Central settings template file.
mv .env.template .env -
Open the settings file using nano editor.
nano .env -
Change the value of DOMAIN to use your domain name. Example: DOMAIN=odk-central.example.com
-
Change the value of SYSADMIN_EMAIL to use a valid email for your email.
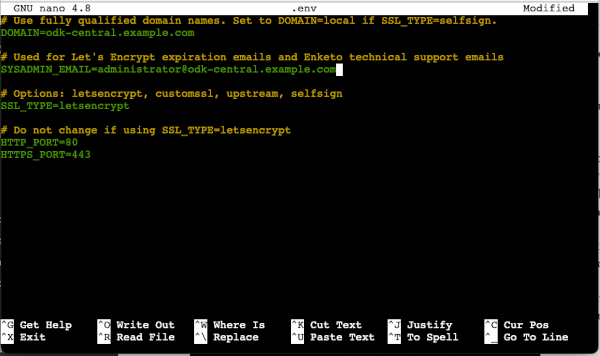
-
Press Control + O (^O) to save the changes.
-
Press ENTER key to confirm the file name.
-
Press Control + X (^X) to close the editor.
-
Create a blank database upgrade file.
touch ./files/allow-postgres14-upgrade -
Build the stack of applications required to run ODK Central service.
docker compose buildThe process will download all the ODK Central Docker images needed and it will take some time to finish. Upon completion of the process, your terminal prompt will be displayed.
Starting Up ODK Central
-
Move to the central directory.
cd /data/central -
Start the ODK Central containers.
docker compose up -dThe
-doption starts the ODK Central containers in the background and leaves them running. -
Show the status of ODK Central containers.
docker compose psIf the output wraps, making it hard to read the column values, filter the columns to be displayed using the following command.
docker compose ps --format 'table {{.Name}}\t{{.State}}\t{{.Service}}'The
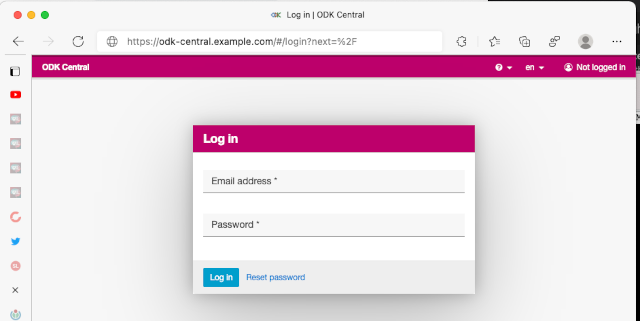
--formatoption specifies the output format of the command to be a table with three columns separated by a tab character.central-nginx-1is the web server container for ODK Central. It should display Up or Up (healthy) under the State column. If the state column displays Up (health: starting), give it more time to complete starting up. -
After the web server has started successfully, visit your domain in a web browser. If everything worked out as expected, the ODK Central login page should be displayed.
Create ODK Central Administrator
-
Move to the ODK Central installation folder.
cd /data/central -
Create a user for the ODK Central software.
docker compose exec service odk-cmd --email YOUREMAIL@ADDRESSHERE.com user-createReplace YOUREMAIL@ADDRESSHERE.com with the email for the user you wish to create. You will be requested to provide a password for the new account.
-
Promote the account to an administrator.
docker compose exec service odk-cmd --email YOUREMAIL@ADDRESSHERE.com user-promote -
To create other users, navigate to your domain in a web browser, log in using the administrator account you have created and create new users from the ODK Central interface.
If you ever forget or lose the administrator’s password, you can reset the password by running the following command:
docker compose exec service odk-cmd --email YOUREMAIL@ADDRESSHERE.com user-set-password
Summary
In this blog article, you have learned how to install ODK Central on a custom server using Docker and Docker Compose. You have also learned how to check for DNS propagation, check available disk space of your custom server, create an administrator account for your ODK Central software, and access the ODK Central web interface. You are now ready to start collecting and managing data with ODK Central.
Resources
- Install Docker Engine on Ubuntu
- Post-installation steps for Linux
- Configure the Docker daemon
- Where are Docker Images Stored? Docker Container Paths Explained
- Proposal: Docker Engine Keys for Docker Remote API Authentication and Authorization #7667
- Install Docker Compose
- Installing Central on DigitalOcean